Contents
Some time ago we wrote about how to fix issue with Internet access. In this article we will mention all possible reasons and solutions to fix WiFi not working on Android device such as phone or tablet. The problem may look quite different. For instance:
- All mobile devices connect to Wi-Fi except one.
- Mobile device connects to all wireless networks but won’t connect to your home router.
- Android phone (tablet) connects to Wi-Fi but suddenly disconnects for no obvious reason soon (or after a definite period of time).
WiFi Not Working On Android. How To Fix?
So let us check everything to find out what precisely is the culprit of the issue. From basics to radical solutions.
Step 1. Reboot your router and your Android device (phone, tablet)

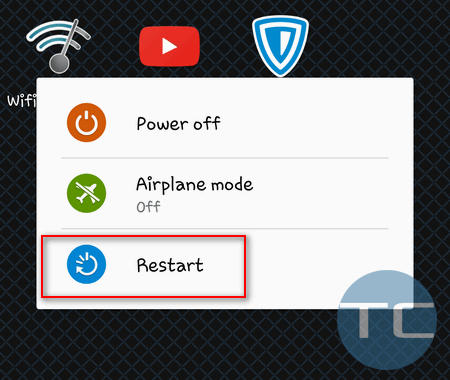
The first thing you should do in similar cases is reboot both your router and your Android device.
First, reboot your router and look what happens:
If Wi-Fi is still not working, reboot your Android device as well:
This is needed to ensure you don’t have an accidental software glitch on one of your devices.
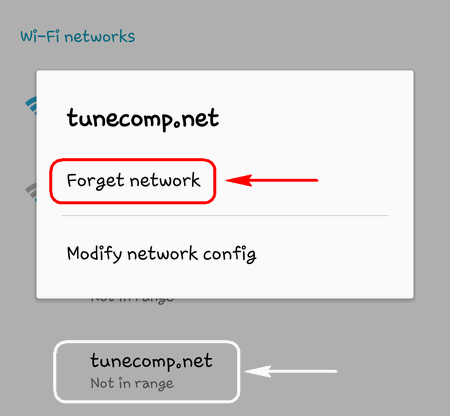
Step 2. Ensure you use correct settings for your wireless network
Wrong settings saved on your machine can be the reason why your Android won’t connect to WiFi network. First, forget the network :
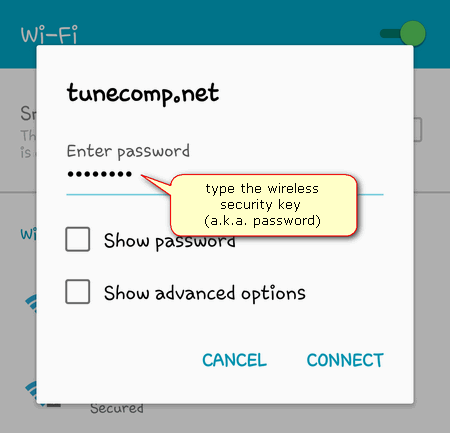
Then reconnect to it again by entering the correct wireless security key (a.k.a. wi-fi password):
Step 3. Ensure the network is yours
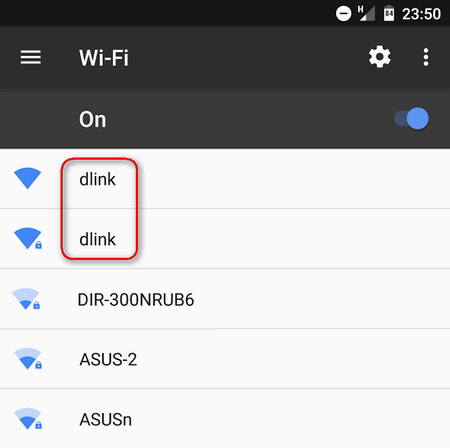
One more funny thing… Check if the Wi-Fi network really yours. For instance, if your network has a default name like dlink or DIR-300NRUB6, you may be trying to connect to your neighbor’s Wi-Fi with the same default SSID.
Of course, it’s recommended to rename your network to a unique SSID.
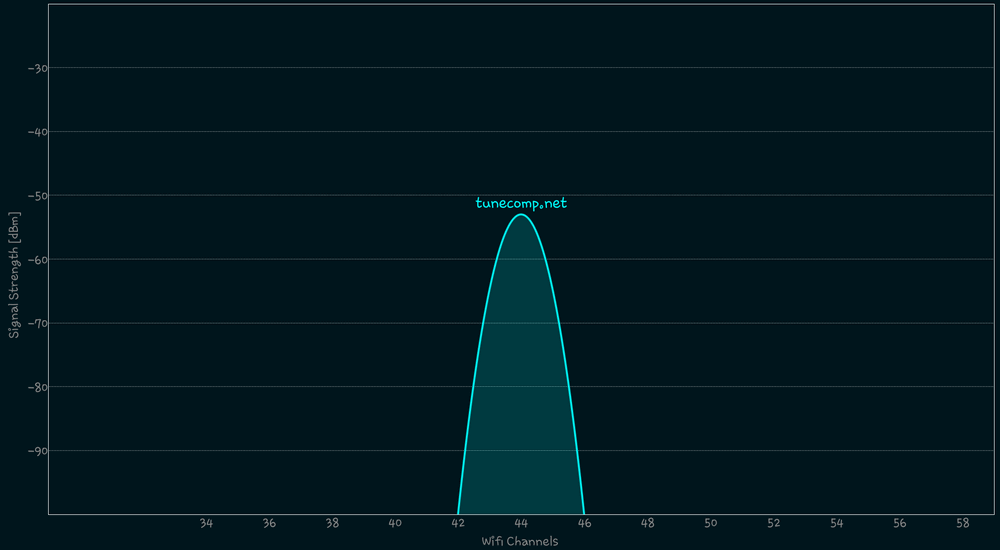
Step 4. Select a better wireless channel
Neighbor Wi-Fi networks can cause interference. That is why you should select the optimal (the least busy) channel. We advise to use WiFi Analyzer app for Android to find out the best wireless channel for your router at your current location.
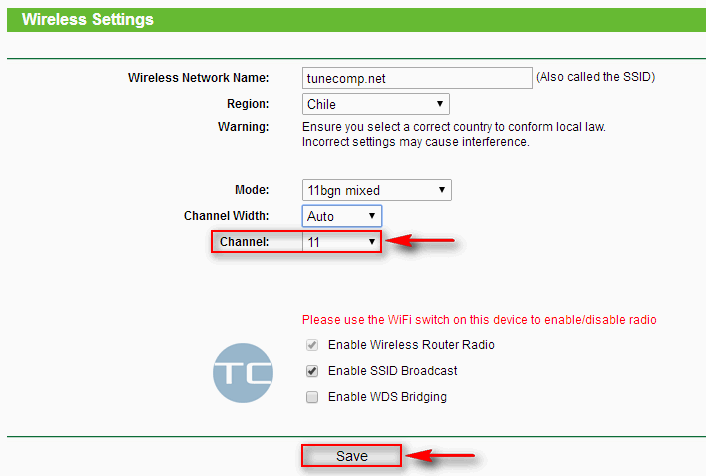
If your device doesn’t support wireless channels higher than #8, it may not detect the wireless network created by your router.
Switch to 5 GHz to evade from wireless interference
Another cool trick is to use 5 GHz instead of 2.4 GHz. But this solution suites you only if both router and client devices support Wi-Fi 802.11ac standard. In 5 GHz range you will most likely be alone in your area:

Step 5. Disable “Avoid poor connections” on Android
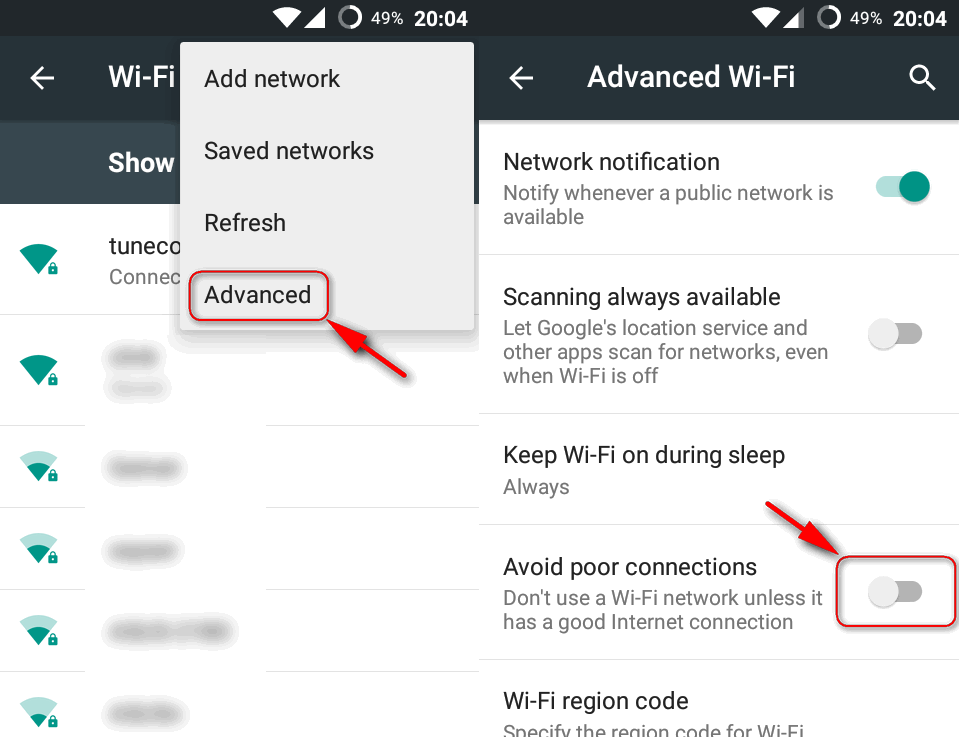
In some cases Android device has a feature that prevents it from using Wi-Fi networks with poor or slow Internet connection. But in some cases it can prevent you from successfully connecting to your own WiFi if it has not perfect signal or Internet quality. So try disabling it. Go to “Settings” > “Wireless & Networks” > “Wi-Fi” > “Advanced” > disable “Avoid poor connections” feature:
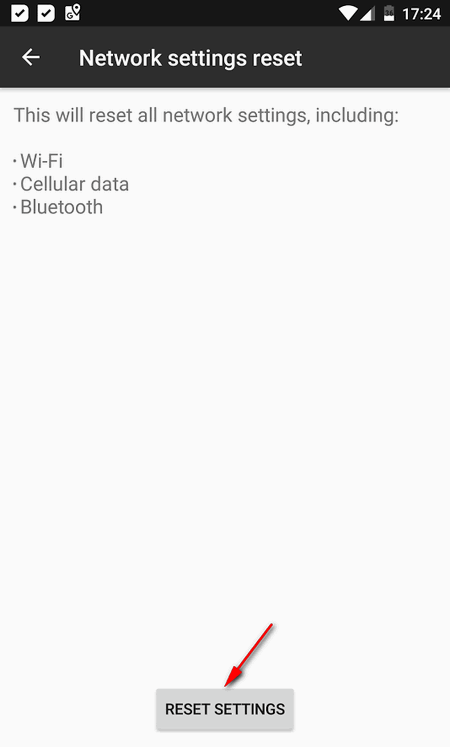
Step 6. Reset network settings on your cellphone (tablet)
Wi-Fi may not work well on Android because of a casual glitch. We recommend that you reset network settings related to Wi-Fi, Cellular data and Bluetooth. It won’t do harm to your device in any case but note that you may need to re-configure your mobile data afterwards (request your career to send settings like APN).
Go to “Settings” > “More” > “Network settings reset” and tap on “RESET SETTINGS”:
Then you may need to confirm your pattern or PIN code.
Step 7. Uninstall suspicious apps and scan your Android device for malware
First, go to Settings > Apps, look through the list of installed apps thoroughly and remove all unknown and suspicious apps, as well as such you don’t need any more. Less apps – less probability to catch glitches.
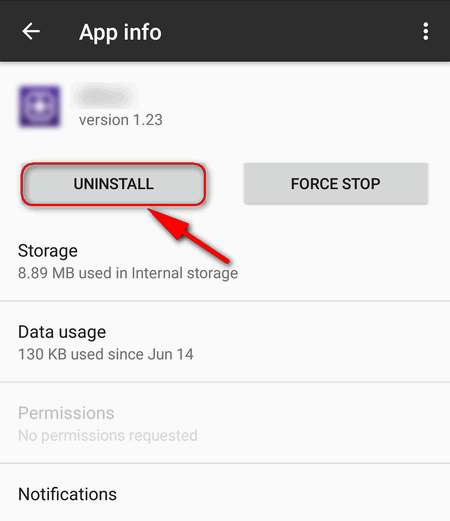
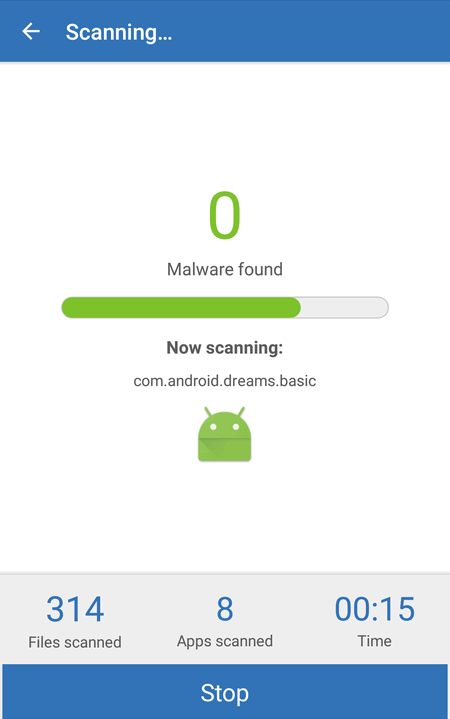
After that install Malwarebytes free app and scan your mobile device for malware:
You may uninstall it right after you ensure you have a completely clean device.
Step 8. Turn off QoS and bandwidth control on your router
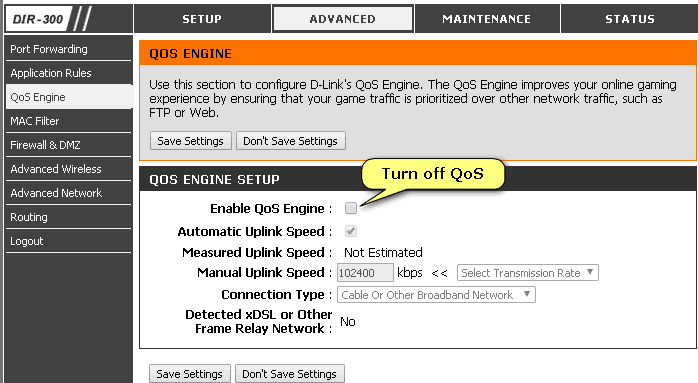
In some cases QoS and Bandwidth control features can prevent you from successfully connecting to WiFi from your Android. So try turning them off temporarily and check if the issue is fixed or not. Usually you need to find “QoS Settings”, remove the flag “Enable QoS Engine” and click “Save Settings”.
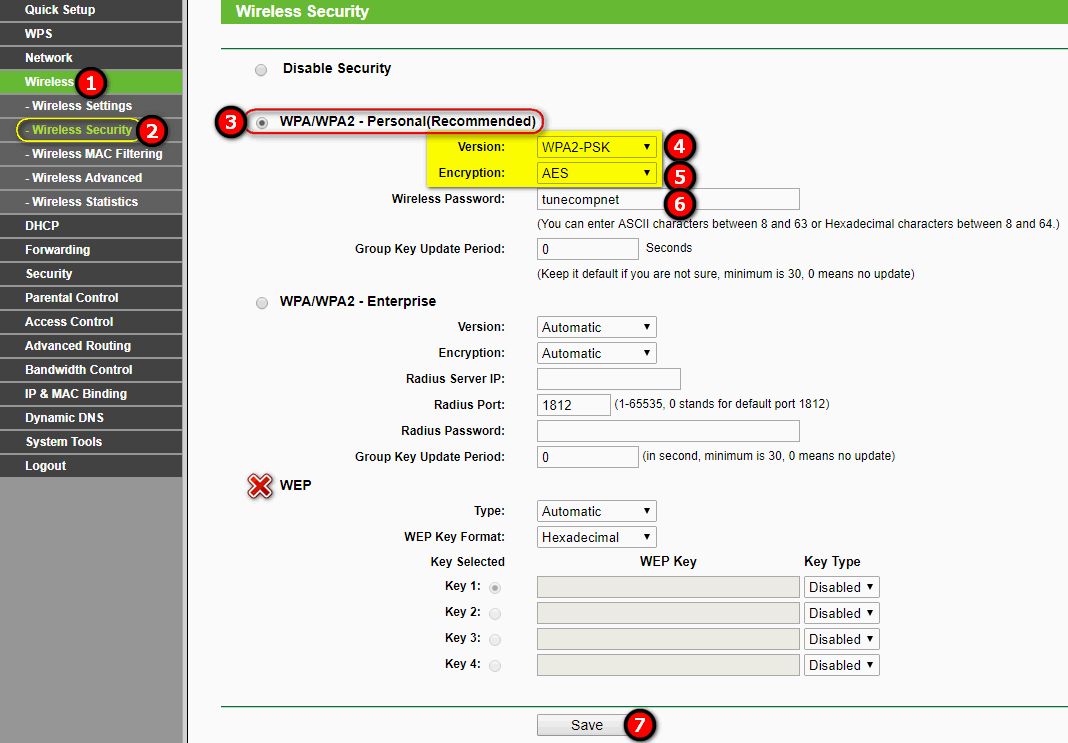
Step 9. Select optimal security settings
Set WPA2 as the security mode and AES as the encryption type. These are the only right variant for home use at present moment. (WPA is vulnerable, WEP is extremely deprecated and vulnerable). If your router allows only WPA/WPA2, well, you have nothing to do except select this option.
Step 10. Try reducing the distance between your wireless router (or AP) and Android device
Your phone, laptop or a tablet may disconnect from Wi-Fi because of a weak signal. The thing is the following. The Wi-Fi signal strength can be enough for the phone to receive it via its receiver, but the phone transmitter’s power can be not enough to send the signal back to the router.
That’s why we recommend you to place your router in the middle of the spot where client devices are usually located.
So you need to try the following: approach your router with mobile device in hands and look what’s happening. If you still see that your Android won’t connect to WiFi when you are a few feet from the router, the reason is not the distance.
Step 11. Upgrade router’s firmware
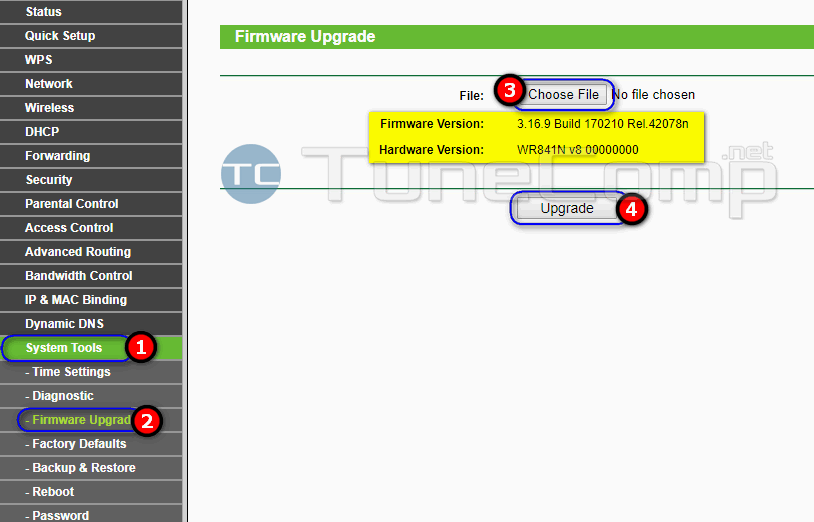
Visit the official website of your router’s vendor and check for a newer firmware. Ensure, you download the compatible firmware paying attention to the router’s model and hardware version. You can upgrade the firmware using the web interface:
Step 12. Reset your router to the factory defaults
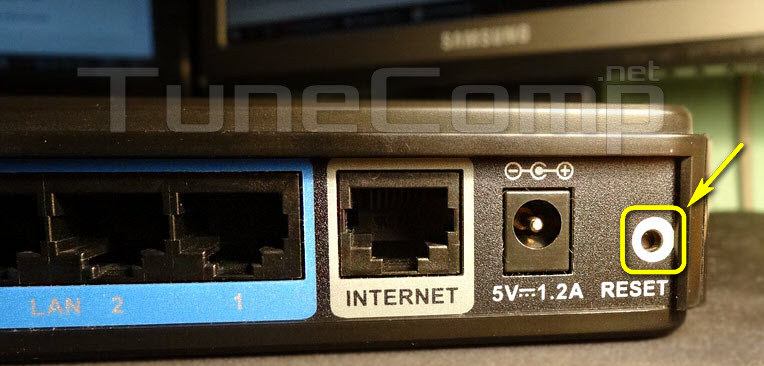
In rather rare cases a glitch occurs on your trusty home wireless router and it stops doing its job for no obvious reason. So, if nothing of the above helped, try to reset your router and set up your Wi-Fi as well as your Internet connection from a scratch. In most cases you need to press and hold the “Reset” button for 15-30 second (or until all indicators light up) while powered on to reset your router to factory defaults:
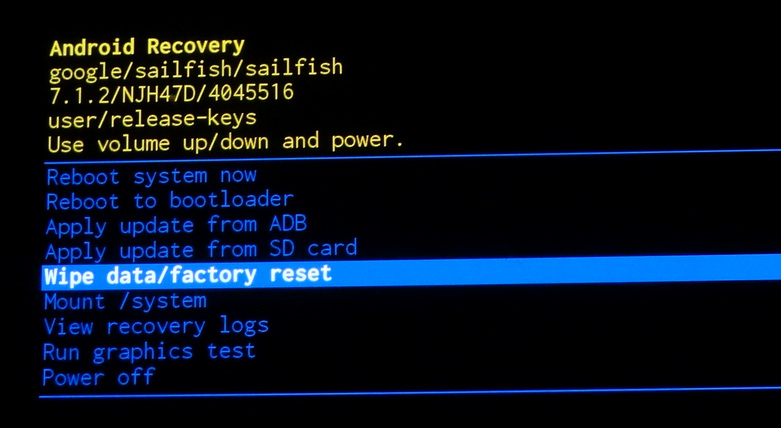
Step 13. Factory reset your Android device
As the last remedy try to reset your Android device to factory defaults. The universal method is to boot into recovery mode and select Wipe data/factory reset:
I think it is logically obvious that it makes sense to perform a factory reset only if you have problems with one particular client device (one device with Android won’t connect to your WiFi while the others do well).
Rare Causes Why Wi-Fi May Not Work On Android And Respective Solutions
Uninstall antivirus app
I remember, I had problems while connecting to my home Wi-Fi because of McAfee app. The issue evaporated right after I removed the app from my phone.
Extend DHCP range on router
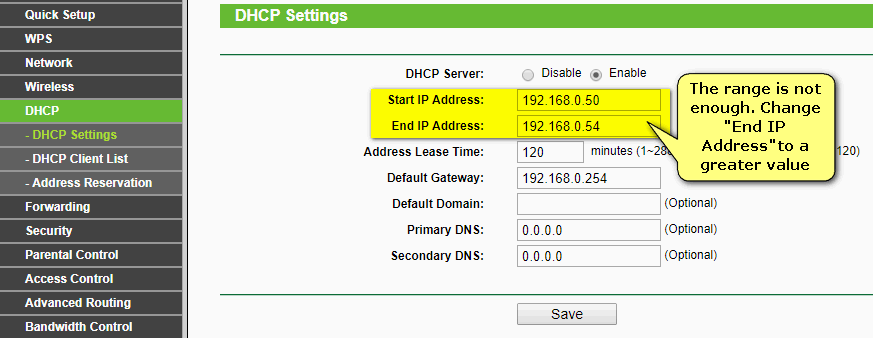
The DHCP range may be not enough to successfully give IP addresses all your client devices at the same time: desktops, laptops, phones, tablets, TVs, etc. Thus, your Android phone may detect Wi-Fi but won’t connect. Change the End IP Address to a greater value to extend the DHCP range:
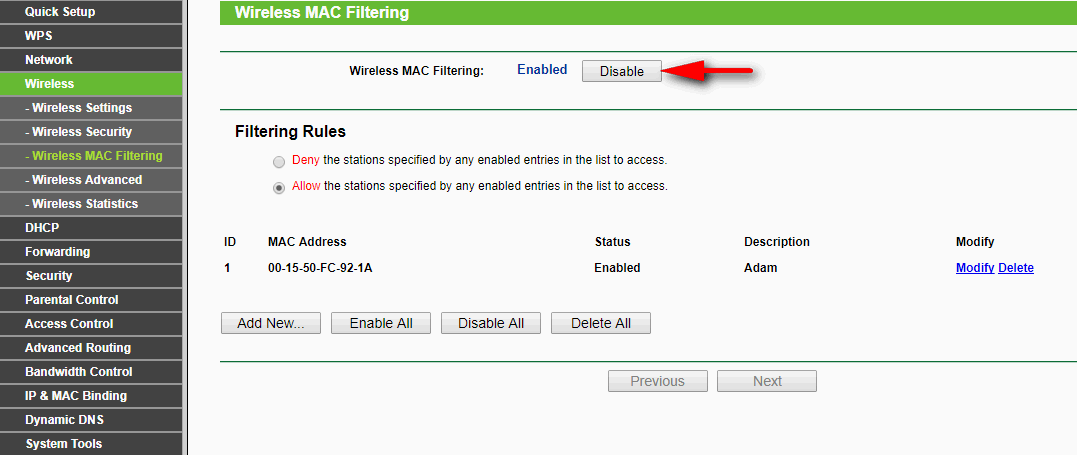
Disable Wireless MAC Address filtering
Android device may fail to connect to Wi-Fi if you have black list or white list active on your router. To check if it is a culprit of the issue, disable MAC filtering globally. If you need this feature you have two way outs:
- include your Android phone’s MAC address to white list;
- exclude your device’s MAC from black list.
Please, share your experience or suggest your solution in the comments.